
 |
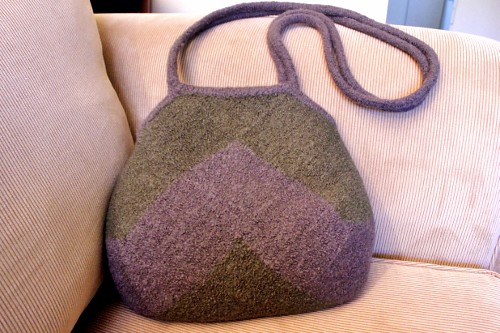
| :: olive and grey wool felted bag |
I am SO please with how it turned out... the only thing I wish I had done was use three colours instead of two and slightly brighter colours as well... maybe next time...? I still love it and can't wait to use it! It still needs to be lined... I really need pockets in my bags!
Notes:
Here are a few of my notes... if you are interested in making this bag:
The original bag info can be found here - ishi knit on Ravelry and there are more images on her blog. These links where quite helpful too - here and here!
My knitted/felted bag:
before felting - height 49cm - width 52cm - straps 166cm
after felting - height 36cm - width 39cm - straps 108cm
I used 4.5 mm knitting needles
5 x 50 grams balls of grey wool and 5 x 50 grams balls of olive wool
It's a good idea to knit a test square and put it in the wash to make sure that it will felt - a big lesson I learnt, that's for sure!!!
 |
| :: moda vera 8 ply wool |
Cast on 25 stitches and knit 50 rows of garter stitch to make each square.
You will need to knit 22 square blocks and 2 half squares (triangle) for the top of the bag. I added triangle pieces to the top of the bag - I just thought it looked neater.
 |
| :: sew bag sides together 1, 2, 3 |
I started from the middle and worked my way outwards. The squares can be knitted separately and then sew together. I chose to knit as much together as possible by picking up stitches on the sides of the knitted squares to add new squares. I still had to sew up some sides of the squares that couldn't be knitted together.
 |
| :: picking up stitches (photo of my previous knitted bag) |
Once the bag body sides are sewn together (see graphic image above for the order to sew it up), you can start on knitting the attached i-cord - tutorial here! First i-cord the top of each triangle piece, then the rest of the body of the bag and then for the straps, knit a plain i-cord - tutorial here! I made extra long straps (166cm before felting) as I wanted the bag to be more like a messenger bag. I had all my fingers crossed that it was going to work out and be the right length after felting... luckily it was!
post note: The straps have stretched quite a bit so I wish I had now made them shorter now... maybe only 120cm long!
.jpg) |
| :: knitted bag completed and ready for felting |
Once it was all finished and all loose ends have been sewn in, I put the bag in the washing machine with an old denim jacket (to help with the agitation for felting) on a very hot wash - 95 degrees celcius for 2 hours and 20 min! Once out of the wash, I stuffed the bag with towels to mold the shape and then allowed to dry.
Hope that is of some help! Sorry, I forgot to take photos of the process during my knitting frenzy of this bag! I was a little bit obessed :)
Good luck... if you have any questions, feel free to email me laminag@hotmail.com
Hope you are having a great creative week!
There are loads more creative people over at my creative space...
It came out great! If you wanted to add some color to it you could always embroider on it (ooh, embroidering on felted wool, so nice in the hands!). But I think it looks great the way it is, too. Glad it worked out this time, and good for you for trying again!
ReplyDeleteI love your determination! You got right back on the horse, where I am sure I would still be getting over the first mishap and not have made it this far. Good on you. It looks brilliant! Clever clever clever! :)
ReplyDeleteSo, so happy that it worked out for you. It looks fantastic, and oh so stylish x
ReplyDeletevery pleased for you the second attempt worked out :) have fun using it (once its lined!) :)
ReplyDeleteWell done! You must have been knitting like crazy to make a second one so fast. Great result.
ReplyDeleteYAY it worked this time. So pleased for you. It looks great.
ReplyDeleteSo glad it turned out beautifully this time, and I love your modification to make it a messenger bag, my favourite type!
ReplyDeleteWow for a great bag and another wow for perseverence.
ReplyDeleteWow stunning, love the heathery colours!
ReplyDeleteOMG... I LOVE this! So fabulous. I'm sure it'd work for crochet too, don't you think? It really looks amazing - great shape and gorgeous colours too :) Kx
ReplyDeleteThanks everyone for you lovely comments :)
ReplyDeleteLamina! I just wanted to give you a big virtual hug for that beautiful comment you just posted on my blog. You don't know how much it means to me that someone like you supports me. You always know what to say too... :)
ReplyDeletethat is fantastic! i would also have left the house, it's so much work to then leave up to chance, even if it is a calculated one. it looks nice knitted, but so much better felted. so inspiring!
ReplyDeleteLooks so beautiful. Is this now the new handbag that you carry around everywhere?
ReplyDeleteRonnie xo
It looks absolutely perfect! Well done for starting over and getting it made so quickly. Can't wait to see it in person :-)
ReplyDeleteYay! I'm so glad your second attempt worked out! The bag looks gorgeous- the colours work so well together! :)
ReplyDeletexoxo Lauren
Oh, it's really wonderful! So happy for you that try #2 worked out. (And just make another one in brighter colors; then you'll have one for Spring/Summer and one for Autumn/Winter. ;))
ReplyDeletethis turned out brilliantly!! - well done. Doris
ReplyDelete