I have FINALLY finished my second knitted bag and felted it! And I am VERY happy to report that it all came out of the wash, just perfect... Hooray! I can tell you there was a massive sigh of relief from me, PHEW!!! When I put my knitted bag into the washing machine (to felt it), I had to take my little man out for the morning... I just couldn't handle, hanging around the house for 2 hours and 20 minutes, waiting for the washing machine (front loader) to go though the cycle... that would have been complete torture!
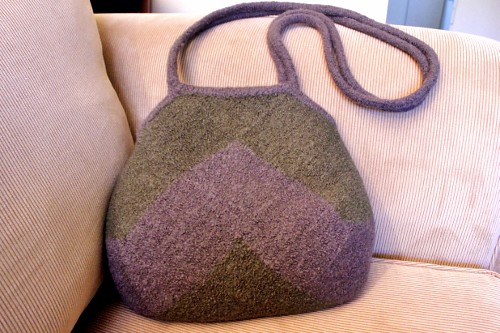 |
| :: olive and grey wool felted bag |
I am SO please with how it turned out... the only thing I wish I had done was use three colours instead of two and slightly brighter colours as well... maybe next time...? I still love it and can't wait to use it! It still needs to be lined... I really need pockets in my bags!
Notes:
Here are a few of my notes... if you are interested in making this bag:
The original bag info can be found here -
ishi knit on Ravelry and there are more images on her
blog. These links where quite helpful too -
here and
here!
My knitted/felted bag:
before felting - height 49cm - width 52cm - straps 166cm
after felting - height 36cm - width 39cm - straps 108cm
I used 4.5 mm knitting needles
5 x 50 grams balls of grey wool and 5 x 50 grams balls of olive wool
It's a good idea to knit a test square and put it in the wash to make sure that it will felt - a big lesson I learnt, that's for sure!!!
 |
| :: moda vera 8 ply wool |
Cast on 25 stitches and knit 50 rows of garter stitch to make each square.
You will need to knit 22 square blocks and 2 half squares (triangle) for the top of the bag. I added triangle pieces to the top of the bag - I just thought it looked neater.
 |
| :: sew bag sides together 1, 2, 3 |
I started from the middle and worked my way outwards. The squares can be knitted separately and then sew together. I chose to knit as much together as possible by picking up stitches on the sides of the knitted squares to add new squares. I still had to sew up some sides of the squares that couldn't be knitted together.
 |
:: picking up stitches
(photo of my previous knitted bag) |
Once the bag body sides are sewn together (see graphic image above for the order to sew it up), you can start on knitting the attached i-cord -
tutorial here! First i-cord the top of each triangle piece, then the rest of the body of the bag and then for the straps, knit a plain i-cord - tutorial
here! I made extra long straps (166cm before felting) as I wanted the bag to be more like a messenger bag.
I had all my fingers crossed that it was going to work out and be the right length after felting... luckily it was!
post note: The straps have stretched quite a bit so I wish I had now made them shorter now... maybe only 120cm long!
.jpg) |
| :: knitted bag completed and ready for felting |
Once it was all finished and all loose ends have been sewn in, I put the bag in the washing machine with an old denim jacket (to help with the agitation for felting) on a very hot wash - 95 degrees celcius for 2 hours and 20 min! Once out of the wash, I stuffed the bag with towels to mold the shape and then allowed to dry.
Hope that is of some help! Sorry, I forgot to take photos of the process during my knitting frenzy of this bag! I was a little bit obessed :)
Good luck... if you have any questions, feel free to email me
laminag@hotmail.com
Hope you are having a great creative week!
There are loads more creative
people over at
my creative space...



+(333x500).jpg)
.jpg)

.jpg)
+(500x350).jpg)



.jpg)
.jpg)
.jpg)
.jpg)

